Hand tracking and volume gesture controller
Computer Vision Adventures: From noob to pro
Introduction
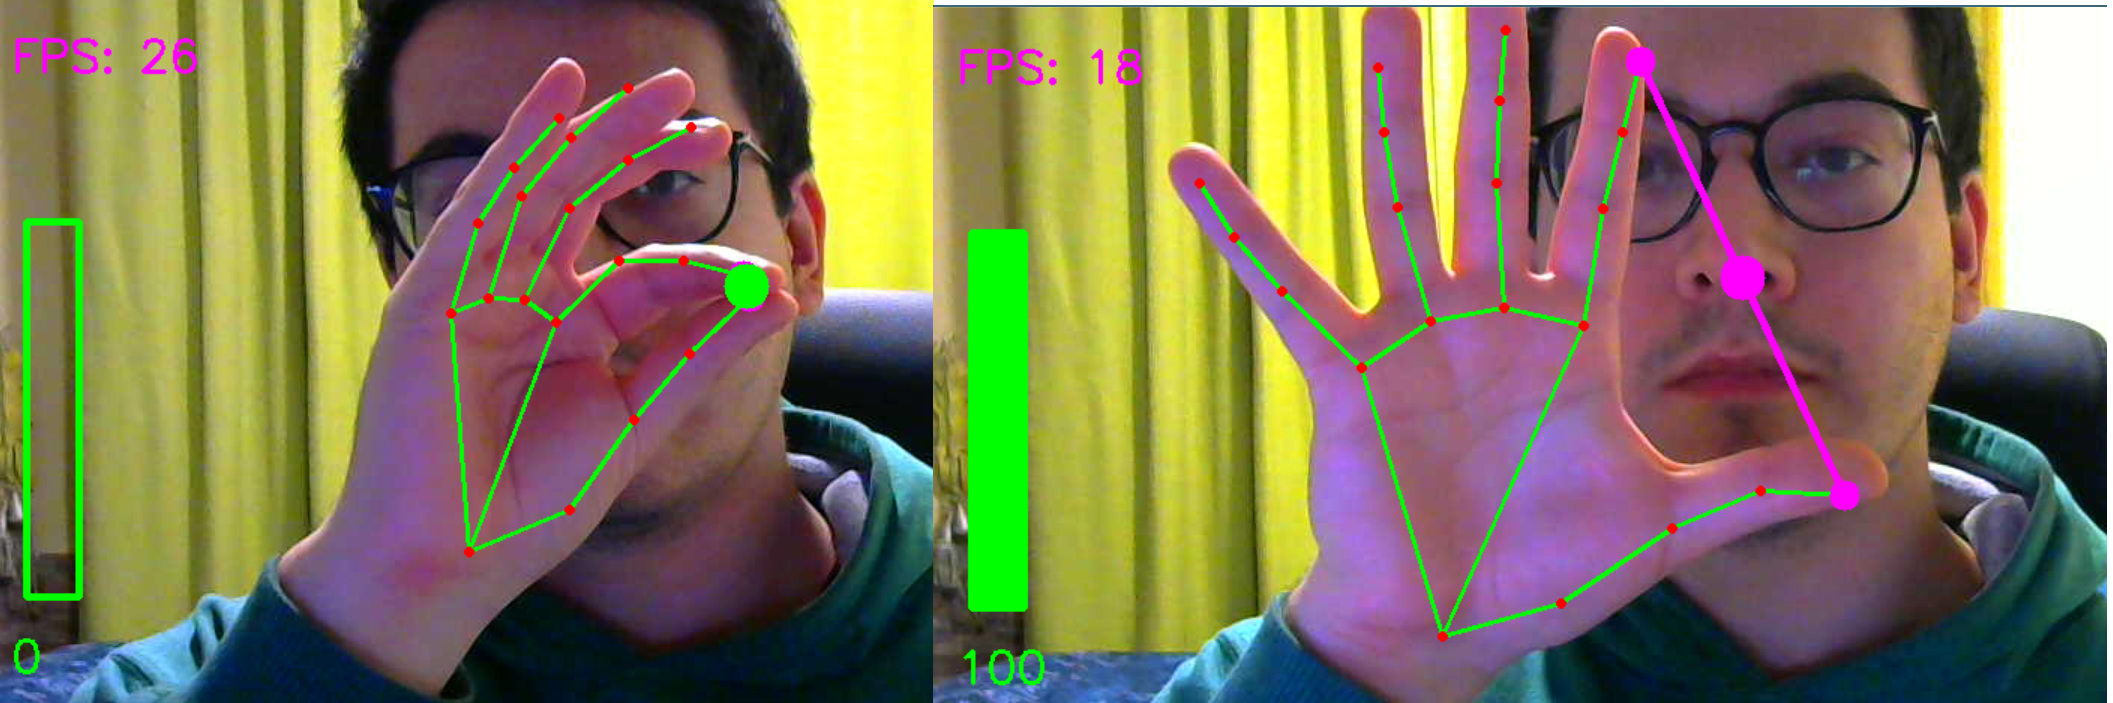
We will first lean how to use our webcam video as an input for a Hand tracking model, and we will modularize it in order to make it easy to use in other projects. As a test, we will build a volume gesture controller, such that we can control the volume of our computer using hand gestures. The result will be will like this (but in real time).
The learning material as well as the project idea can be found mainly in computervision.zone, mediapipe and opencv. The main difference is that I will be exploring and explaining step by step from the deep learning model to the coding.
Table of contents
- Setting up environment.
- Basics: Read the webcam.
- Hand Detection and Tracking using Mediapipe
- Mediapipe Hands Model.
- Palm Detection Model.
- Hand Landmark Model.
- Coding it.
- Modularize.
- Volume Gesture Controller using Hand Tracking module
Setting up environment
Install the requirements
pip install opencv-contrib-python
pip install mediapipe
Basics: Read the camera
import cv2 # opencv
import sys  # Python Standard Library System-specific parameters and functions

# if we have more than one camera, we select one with the variable s
s = 0
if len(sys.argv) > 1:
    s = sys.argv[1]

# Define camera we are going to read
source = cv2.VideoCapture(s)
# Create a window for the camera
win_name = "Camera Preview: ESC to exit"
cv2.namedWindow(win_name, cv2.WINDOW_NORMAL)

# While we don't press the "ESC" key the window will remain open
# and we will show the frame in the window previously defined
while cv2.waitKey(1) != 27:
    success, frame = source.read()
    # if we don't read the image successfully break the loop
    if not success:
        break
    # Otherwise show the frame on the window
    cv2.imshow(win_name, frame)

# Since we exit the loop, its time to clean resources
source.release()
cv2.destroyWindow(win_name)
Hand Detection and Tracking using Mediapipe
I will give a brief description on the Mediapipe models and focus on how to use them together with opencv. Also, I will be using images and videos from the documentation at Google Mediapipe
Mediapipe Hands Model
MediaPipe Hands is a high-fidelity hand and finger tracking solution. It employs machine learning (ML) to infer 21 3D landmarks of a hand from just a single frame. Its ML Pipeline consists of multiple models working together. A palm detection model that operates on the full image and returns an oriented hand bounding box. A hand landmark model that operates on the cropped image region defined by the palm detector and returns high-fidelity 3D hand keypoints. In addition, in the pipeline the crops can also be generated based on the hand landmarks identified in the previous frame, and only when the landmark model could no longer identify hand presence is palm detection invoked to relocalize the hand.
![]()
Fig.1 - Tracked 3D hand landmarks are represented by dots in different shades, with the brighter ones denoting landmarks closer to the camera.
Palm Detection Model
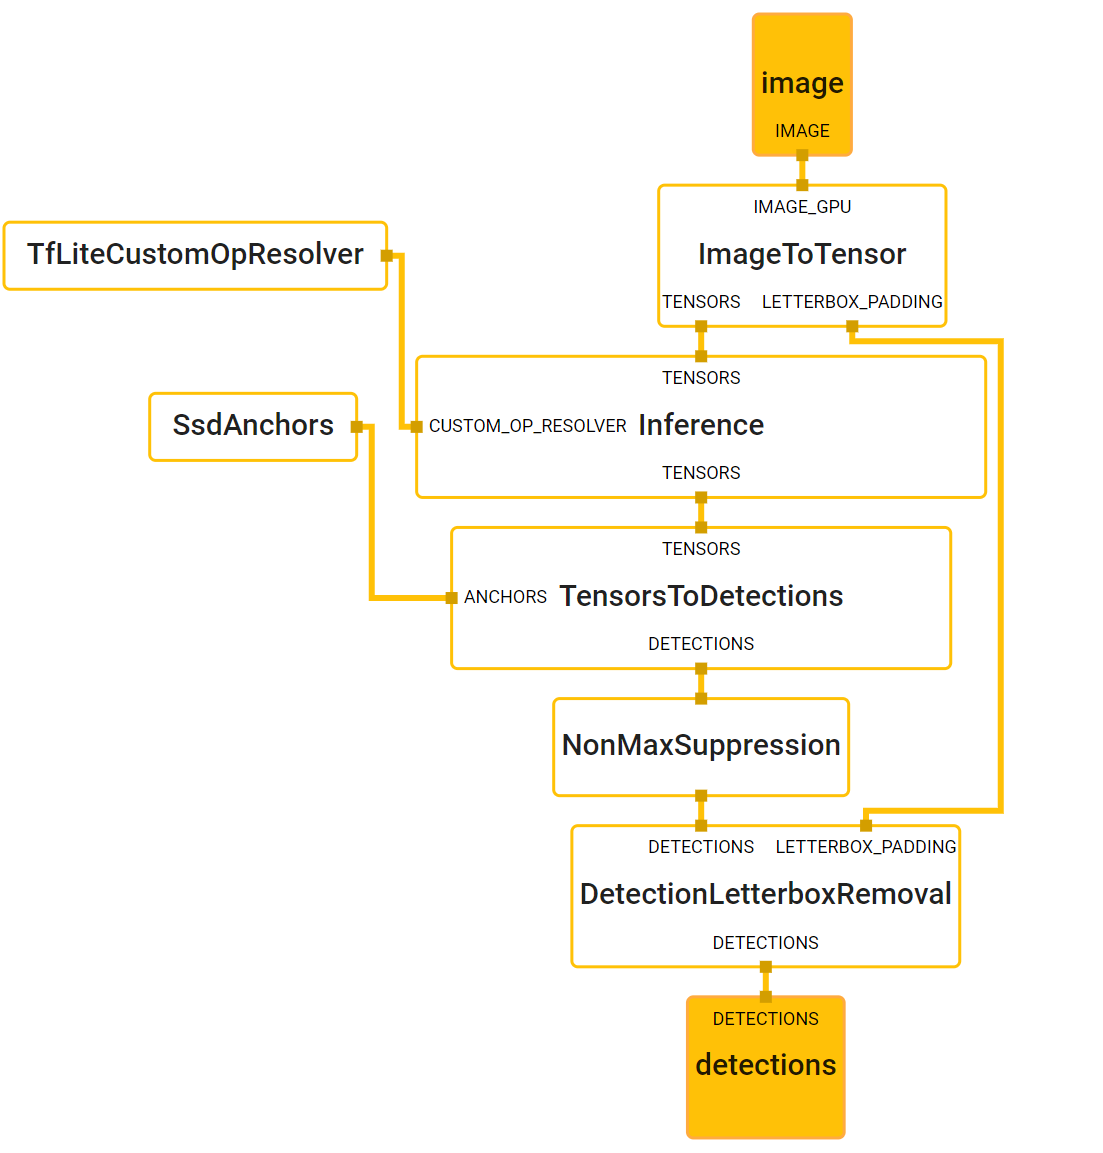
The first step will be detecting a palm, since estimating bounding boxes of rigid objects like palms and fists is significantly simpler than detecting hands with articulated fingers. For this task, a single-shot detector has been used ( SSD: Single Shot MultiBox Detector Paper). In addition, as palms are smaller objects and the single-shot detector will create many boxes, some technique to select the correct entity must be used, for this problem the non-maximum supression algorithm works well even for two-hand-self-occlusion cases, like handshakes. Moreover, palms can be modelled using square bounding boxes (anchors in ML terminology) ignoring other aspect ratios, and therefore reducing the number of anchors by a factor of 3-5. Second, an encoder-deocoder feature extractor is used for bigger scene context awareness even for small objects.
The average precision of this palm detection model is 95.7%.
Note on The Non Maximum Supression (NMS) algorithm : is a technique used in many computer vision algorithms. It is a class of algorithms to select one entity (e.g. bounding boxes) out of many overlapping entities. The selection criteria can be chosen to arrive at particular results. Most commonly, the criteria is some form of probability number along with some form of overlap measure (e.g. IOU). read more about it here

NMS
Finally we can see the computation graph of the model.
Hand Landmark Model
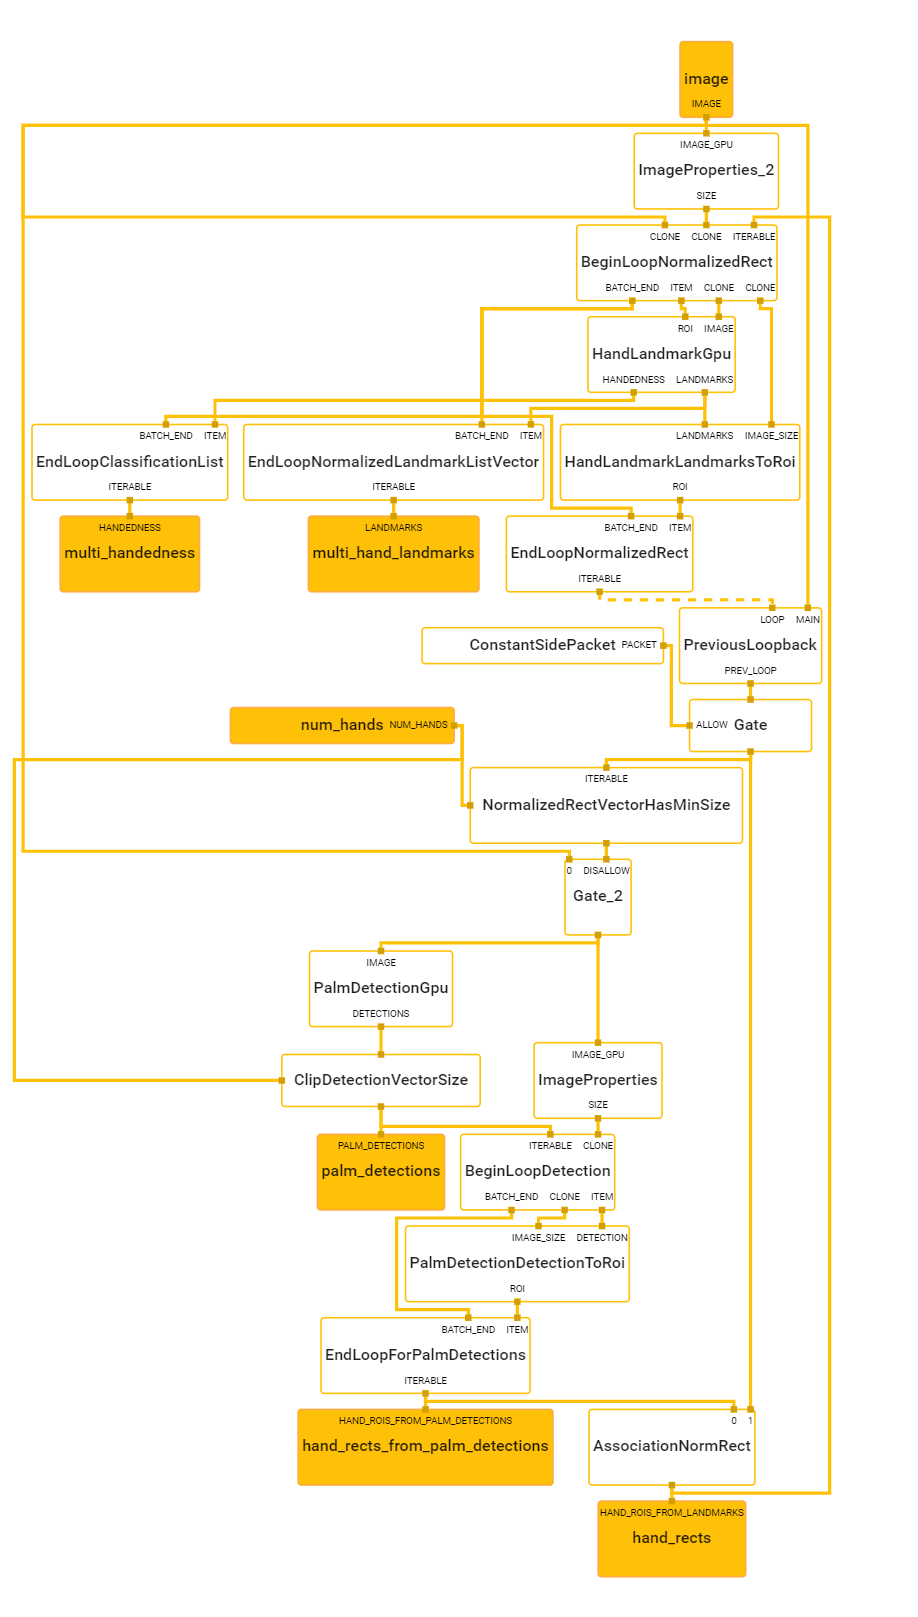
After the palm detection over the whole image, the hand landmark model performs precise keypoint localization of 21 3D hand-knuckle coordinates inside the detected hand regions via regression, that is direct coordinate prediction. The model learns a consistent internal hand pose representation and is robust even to partially visible hands and self-occlusions.

Fig.2 - Hand Landmarks

Fig.3 - Top: Aligned hand crops passed to the tracking network with ground truth annotation. Bottom: Rendered synthetic hand images with ground truth annotation.
We can see the computation graph here.
Coding it
First lets take a look at the Hands class provided by Mediapipe to check what we need.
For instance, as opencv reads images in BGR format, we need to check if this class needs an RGB one.
class Hands(SolutionBase):
  """MediaPipe Hands.

  MediaPipe Hands processes an RGB image and returns the hand landmarks and
  handedness (left v.s. right hand) of each detected hand.

  Note that it determines handedness assuming the input image is mirrored,
  i.e., taken with a front-facing/selfie camera (
  https://en.wikipedia.org/wiki/Front-facing_camera) with images flipped
  horizontally. If that is not the case, use, for instance, cv2.flip(image, 1)
  to flip the image first for a correct handedness output.

  Please refer to https://solutions.mediapipe.dev/hands#python-solution-api for
  usage examples.
  """

  def __init__(self,
               static_image_mode=False,
               max_num_hands=2,
               min_detection_confidence=0.5,
               min_tracking_confidence=0.5):
    """Initializes a MediaPipe Hand object.

    Args:
      static_image_mode: Whether to treat the input images as a batch of static
        and possibly unrelated images, or a video stream. See details in
        https://solutions.mediapipe.dev/hands#static_image_mode.
      max_num_hands: Maximum number of hands to detect. See details in
        https://solutions.mediapipe.dev/hands#max_num_hands.
      min_detection_confidence: Minimum confidence value ([0.0, 1.0]) for hand
        detection to be considered successful. See details in
        https://solutions.mediapipe.dev/hands#min_detection_confidence.
      min_tracking_confidence: Minimum confidence value ([0.0, 1.0]) for the
        hand landmarks to be considered tracked successfully. See details in
        https://solutions.mediapipe.dev/hands#min_tracking_confidence.
    """

  def process(self, image: np.ndarray) -> NamedTuple:
    """Processes an RGB image and returns the hand landmarks and handedness of each detected hand.

    Args:
      image: An RGB image represented as a numpy ndarray.

    Raises:
      RuntimeError: If the underlying graph throws any error.
      ValueError: If the input image is not three channel RGB.

    Returns:
      A NamedTuple object with two fields: a "multi_hand_landmarks" field that
      contains the hand landmarks on each detected hand and a "multi_handedness"
      field that contains the handedness (left v.s. right hand) of the detected
      hand.
    """
From here we see a few things:
- We will have to convert the image using
cv2.cvtColor(img,cv2.COLOR_BGR2RGB) - To define a Hands object we need to access to
mediapipe.solutions.hands.Hands(*Args) - We need to call the
processfunction to run the inference model in our image, and get the results by calling.multi_hand_landmarks.
With this we will have our results as coordinates, as we saw in the Hand Landmark Model section
there are 21 landmark points so there must be some function to automatically draw the landmarks and the conections
between them right? Indeed, if we check mediapipe.solutions.drawing_utils we can see the following
method.
def draw_landmarks(
    image: np.ndarray,
    landmark_list: landmark_pb2.NormalizedLandmarkList,
    connections: Optional[List[Tuple[int, int]]] = None,
    landmark_drawing_spec: DrawingSpec = DrawingSpec(color=RED_COLOR),
    connection_drawing_spec: DrawingSpec = DrawingSpec()):
  """Draws the landmarks and the connections on the image.

  Args:
    image: A three channel RGB image represented as numpy ndarray.
    landmark_list: A normalized landmark list proto message to be annotated on
      the image.
    connections: A list of landmark index tuples that specifies how landmarks to
      be connected in the drawing.
    landmark_drawing_spec: A DrawingSpec object that specifies the landmarks'
      drawing settings such as color, line thickness, and circle radius.
    connection_drawing_spec: A DrawingSpec object that specifies the
      connections' drawing settings such as color and line thickness.

  Raises:
    ValueError: If one of the followings:
      a) If the input image is not three channel RGB.
      b) If any connetions contain invalid landmark index.
  """
Now we are ready to run code it, lets get an image from our webcam, run the inferece model on it an finally draw the landmarks and conections.
import cv2
import sys
import mediapipe as mp

s = 0
if len(sys.argv) > 1:
    s = sys.argv[1]

source = cv2.VideoCapture(s)
win_name = "Camera Preview: ESC to exit"
cv2.namedWindow(win_name, cv2.WINDOW_NORMAL)

mp_hands = mp.solutions.hands
hands = mp_hands.Hands()
mp_draw = mp.solutions.drawing_utils

while cv2.waitKey(1) != 27:
    success, frame = source.read()
    if not success:
        break
    imgRGB = cv2.cvtColor(frame, cv2.COLOR_BGR2RGB)
    # To improve performance, optionally mark the image as not writeable to
    # pass by reference.
    imgRGB.flags.writeable = False
    # Run inference model on the RGB image
    results = hands.process(imgRGB)
    # We will like to know the hand_landmarks of all hands detected
    if results.multi_hand_landmarks:
        for hand_landmark in results.multi_hand_landmarks:
            mp_draw.draw_landmarks(frame, hand_landmark, mp_hands.HAND_CONNECTIONS)

    cv2.imshow(win_name, frame)

source.release()
cv2.destroyWindow(win_name)
Now lets say we want to access some specific landmarks, can we do it? the answer is yes,
we can get the ID and relative coordinates (x,y) accesing to the .landmark
method.
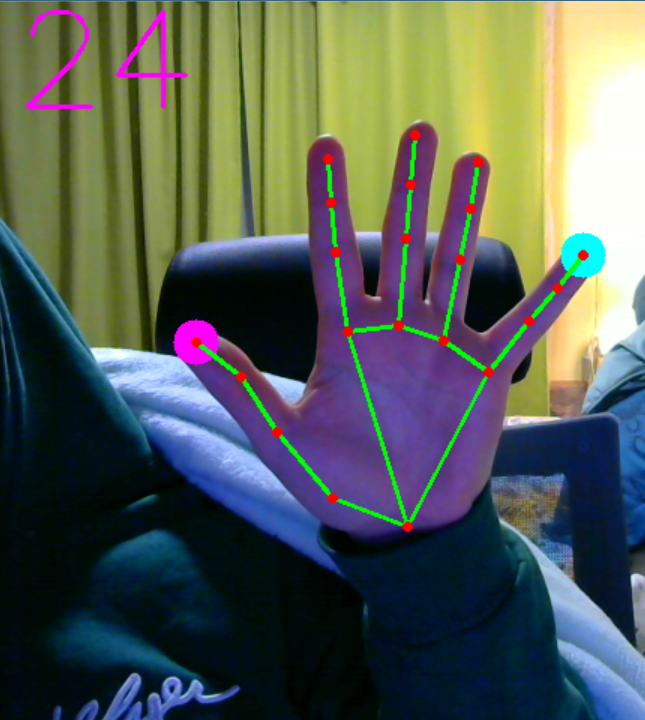
In the following code I draw some special circles on the landmarks 4 and 20 (see picture in Hand Landmark Model) and added some Frames per second count on the top left corner.
import cv2
import sys
import time
import mediapipe as mp

s = 1
if len(sys.argv) > 1:
    s = sys.argv[1]

source = cv2.VideoCapture(s)
win_name = "Camera Preview: ESC to exit"
cv2.namedWindow(win_name, cv2.WINDOW_NORMAL)

mp_hands = mp.solutions.hands
hands = mp_hands.Hands()
mp_draw = mp.solutions.drawing_utils

# To make FPS count
previous_time = time.time()

while cv2.waitKey(1) != 27:
    success, frame = source.read()
    if not success:
        break
    imgRGB = cv2.cvtColor(frame, cv2.COLOR_BGR2RGB)
    # To improve performance, optionally mark the image as not writeable to
    # pass by reference.
    imgRGB.flags.writeable = False
    # Run inference model on the RGB image
    results = hands.process(imgRGB)
    # We will like to know the hand_landmarks of all hands detected
    if results.multi_hand_landmarks:
        for hand_landmark in results.multi_hand_landmarks:
            # If we want to do things with an specifict landmark
            for id_landmark, landmark in enumerate(hand_landmark.landmark):
                # The coordinates of the landmarks are relative to the height and width
                height, width, channels = frame.shape
                center_x, center_y = int(landmark.x * width), int(landmark.y * height)
                if id_landmark == 4:
                    cv2.circle(frame, (center_x, center_y), 15, (255, 0, 255), cv2.FILLED)
                if id_landmark == 20:
                    cv2.circle(frame, (center_x, center_y), 15, (255, 255, 0), cv2.FILLED)

            mp_draw.draw_landmarks(frame, hand_landmark, mp_hands.HAND_CONNECTIONS)

    # Display FPS count
    current_time = time.time()
    fps = int(1/(current_time - previous_time))
    previous_time = current_time
    cv2.putText(frame, str(fps), (10,70), cv2.FONT_ITALIC, 3, (255, 0, 255), thickness = 2)

    cv2.imshow(win_name, frame)

source.release()
cv2.destroyWindow(win_name)
Modularize all we have learned today
As we saw before, we are recycling the same code time over time, for this reason, it will come in handy to modularize what we have done so that we can use it on other projects as well.
The module will look like this.
import cv2
import time
import mediapipe as mp

class handDetector():
    def __init__(self,
                 static_image_mode=False,
                 max_num_hands=2,
                 min_detection_confidence=0.5,
                 min_tracking_confidence=0.5):

        self.static_image_mode = static_image_mode
        self.max_num_hands = max_num_hands
        self.min_detection_confidence = min_detection_confidence
        self.min_tracking_confidence = min_tracking_confidence
        # Initializing Hand model and drawing utils
        self.mp_hands = mp.solutions.hands
        self.hands = self.mp_hands.Hands(self.static_image_mode,
                                         self.max_num_hands,
                                         self.min_detection_confidence,
                                         self.min_tracking_confidence)
        self.mp_draw = mp.solutions.drawing_utils

    def findHands(self, img):
        imgRGB = cv2.cvtColor(img, cv2.COLOR_BGR2RGB)
        imgRGB.flags.writeable = False
        # Run inference model on the RGB image
        self.results = self.hands.process(imgRGB)
        if self.results.multi_hand_landmarks:
            for hand_landmark in self.results.multi_hand_landmarks:
                 self.mp_draw.draw_landmarks(img, hand_landmark, self.mp_hands.HAND_CONNECTIONS)
        return img

    def findPosition(self, img, hand_number = 0):
        landmark_list = []
        if self.results.multi_hand_landmarks:
            hand = self.results.multi_hand_landmarks[hand_number]
            for id_landmark, landmark in enumerate(hand.landmark):
                height, width, channels = img.shape
                center_x, center_y = int(landmark.x * width), int(landmark.y * height)
                landmark_list.append([id_landmark, center_x, center_y])
        return landmark_list

# This is for testing in the same module that everything works
def main():
    source = cv2.VideoCapture(1)
    win_name = "Camera Preview: ESC to exit"
    cv2.namedWindow(win_name, cv2.WINDOW_NORMAL)
    detector = handDetector()
    previous_time = time.time()
    while cv2.waitKey(1) != 27:
        success, frame = source.read()
        if not success:
            break
        img = detector.findHands(frame)
        landmark_list = detector.findPosition(img)
        if len(landmark_list) != 0:
            print(landmark_list[4])
        # Display FPS count
        current_time = time.time()
        fps = int(1 / (current_time - previous_time))
        previous_time = current_time
        cv2.putText(frame, str(fps), (10, 70), cv2.FONT_ITALIC, 3, (255, 0, 255), thickness=2)

        cv2.imshow(win_name, img)

    source.release()
    cv2.destroyWindow(win_name)

if __name__ == '__main__':
    main()
Then if we want to use it we just do the following:
import cv2
import mediapipe as mp
import HandTrackingModule

source = cv2.VideoCapture(1)
win_name = "Camera Preview: ESC to exit"
cv2.namedWindow(win_name, cv2.WINDOW_NORMAL)

detector = HandTrackingModule.handDetector()

while cv2.waitKey(1) != 27:
    success, frame = source.read()
    if not success:
        break
    img = detector.findHands(frame)

    cv2.imshow(win_name, img)

source.release()
cv2.destroyWindow(win_name)
Volume Gesture Controller
We have a hand tracking module already done, so let’s say we want to control the volume of our computer by moving the thumb and index finger closer and further away from each other. From before we now the thumb is landmark number 4 and the index is landmark number 8.
Now we can think on creating a straight line between the landmark 4 and 8, and computing its length which will be proportional
to the volume. We need to be careful with the following, the length of this line might not be 0 even when we have our fingers touching
each other, because the landmark points are not on the edge and we don’t know what is the distance in pixels when they are the farthest
away from each other, therefore we will have to print the length and create a UPPER_BOUND
and LOWER_BOUND based on this, second, the volume range that our package will can be 0 to 100, but it can also be something else, in any case
we need to map our [LOWER_BOUND, UPPER_BOUND] interval into [MIN_VOL, MAX_VOL].
Finally, just to make it look prettier, we will add draw a circle in the middle point that will change color when both fingers are super close to each other and a volume bar to the left of the screen.
Volume Controller Package
We will use pycaw as it is pretty straightforward to use from the github repository we can see the following:
from ctypes import cast, POINTER
from comtypes import CLSCTX_ALL
from pycaw.pycaw import AudioUtilities, IAudioEndpointVolume
devices = AudioUtilities.GetSpeakers()
interface = devices.Activate(
    IAudioEndpointVolume._iid_, CLSCTX_ALL, None)
volume = cast(interface, POINTER(IAudioEndpointVolume))
volume.GetMute()
volume.GetMasterVolumeLevel()
volume.GetVolumeRange()
volume.SetMasterVolumeLevel(-20.0, None)
From here we can see that the first lines are initialization of the devices and creating a volume object, this one
has some methods, from which we are interested in the last two, GetVolumeRange() and SetMasterVolumeLevel(-20.0, None).
Finishing it!
Our final code will look like this:
import cv2
import sys
import numpy as np
import time
from ctypes import cast, POINTER
from comtypes import CLSCTX_ALL
from pycaw.pycaw import AudioUtilities, IAudioEndpointVolume
import HandTrackingModule as htm

s = 0
if len(sys.argv) > 1:
    s = sys.argv[1]

# Define width and height of the webcam
width_cam, height_cam = 1280, 720

# Define camera we are going to read
source = cv2.VideoCapture(s)
source.set(3, width_cam) # Property number 3 : width
source.set(4, height_cam) # Property number 4: height
# Create a window for the camera
win_name = "Camera Preview: ESC to exit"
cv2.namedWindow(win_name, cv2.WINDOW_NORMAL)

previous_time = 0
# Initialize detector
detector = htm.handDetector(max_num_hands=1,
                            min_tracking_confidence=0.7,
                            min_detection_confidence=0.7)

# Initialize Audio devices
devices = AudioUtilities.GetSpeakers()
interface = devices.Activate(IAudioEndpointVolume._iid_, CLSCTX_ALL, None)
volume = cast(interface, POINTER(IAudioEndpointVolume))

# Get Volume Range
volume_range = volume.GetVolumeRange()
MIN_VOLUME, MAX_VOLUME = volume_range[0], volume_range[1]

# Define constants
UPPER_BOUND = 300
LOWER_BOUND = 30

vol_bar = 400
vol_per = 0

while cv2.waitKey(1) != 27:
    success, frame = source.read()
    # if we don't read the image successfully break the loop
    if not success:
        break

    img = detector.findHands(frame)
    landmark_list = detector.findPosition(img)
    if len(landmark_list) != 0:
        thumb_x, thumb_y = landmark_list[4][1], landmark_list[4][2]
        index_x, index_y = landmark_list[8][1], landmark_list[8][2]
        # Middle point of the line connecting the thumb and index fingers
        cx, cy = (thumb_x + index_x) // 2, (thumb_y + index_y) // 2

        cv2.circle(img, (thumb_x, thumb_y), 10, (255, 0, 255), cv2.FILLED)
        cv2.circle(img, (index_x, index_y), 10, (255, 0, 255), cv2.FILLED)
        cv2.circle(img, (cx, cy), 15, (255, 0, 255), cv2.FILLED)
        cv2.line(img, (thumb_x, thumb_y), (index_x, index_y), (255, 0, 255), 3)

        # Check the legnth of the line to define the UPPER and LOWER bounds
        # Then when we are in the UPPER bound = 100% Volumne
        line_length = np.hypot(index_x - thumb_x, index_y - thumb_y)

        # Map range [30, 320] to [MIN_VOLUME, MAX_VOLUME]
        vol = np.interp(line_length, [LOWER_BOUND, UPPER_BOUND], [MIN_VOLUME, MAX_VOLUME])
        volume.SetMasterVolumeLevel(vol, None)

        vol_bar = np.interp(line_length, [LOWER_BOUND, UPPER_BOUND], [400, 150])
        vol_per = np.interp(line_length, [LOWER_BOUND, UPPER_BOUND], [0, 100])

        if line_length < LOWER_BOUND:
            cv2.circle(img, (cx, cy), 15, (0, 255, 0), cv2.FILLED)


    cv2.rectangle(img, (50, 150), (85, 400), (0, 255, 0), 3)
    cv2.rectangle(img, (50, int(vol_bar)), (85, 400), (0, 255, 0), cv2.FILLED)
    cv2.putText(img, f"{int(vol_per)}", (40, 450), cv2.FONT_ITALIC, 1, (0, 255, 0), 2)

    current_time = time.time()
    fps = int(1 / (current_time - previous_time))
    previous_time = current_time
    cv2.putText(img, f"FPS: {fps}", (40, 50), cv2.FONT_ITALIC, 1, (255, 0, 255), 2)

    cv2.imshow(win_name, frame)

# Since we exit the loop, its time to clean resources
source.release()
cv2.destroyWindow(win_name)
Daniel Pereda
Data Scientist
My research interests include optimization, game theory and operation research.